Showing posts with label distress inks. Show all posts

Saturday, August 4, 2012

Happy Early Halloween! Yes! It's already HALLOWEEN PROJECT TIME in da SCRAPiVERSE!

What a week!  Summer is killing me in all its 112 degree weather, the air conditioner in my house broke, I found out my drivers license has been expired for two months, and to just top it all off- the hotel I ran away to, during the air conditioning tragedy, had a little surprise in store for me, as well.  Not seconds after they took the payment, I learned they were hosting some kind of national drag queen beauty pageant.  And I don't know if you know this or not- but drag queens are LOUD.  I am pretty sure that I'm suffering a form of PTSD.

Enough of my hardships-  HELLO! How ya doin'?!  I bet you thought I'd never ask!  Where were my manners?!  Oh, that's right.  They were destroyed in the soul crushing reality that hinders my every move.  Just kidding.  I love my life.  Without it, I'd be dead.

What's all this talk about evil death on a lovely Saturday?  HELLO!  Really?  You don't know?  I'll tell you:  It is now less than two months until Halloween.

Halloween has been my favorite holiday since I bought my first plastic skeleton at TG&Y.  (For you young people, that was like our Wal-Mart.)  I love everything about Halloween:  The costumes.  The decorations.  The wild, drunken parties where you can convince a few of the least intelligent 'Sexy Nurses' to help you steal all the beer out of the host's bathtub and take it with you to the next party.  You know, all the great Halloween traditions.

Of all the Halloween-inspired activities that thrill me, Halloween crafts will always be the thing I look forward to the most...  So tear open that fresh box of wine you picked up on the way home from work yesterday, pop in a set of plastic vampire teeth, and have a look at my Little Goblin.


That's my Little Goblin.

I was at Wal-Mart about a week ago.  I hate that place- as would anyone who hates fighting loud, pushy people with seven kids who are holding up the line while they try to convince the cashier that YES YOU CAN BUY BEER WITH FOOD STAMPS NOW.  Just as I wanted to scream, 'GIVE IT UP, LADY, YOU WON'T FOOL HER- SO LET ME  CUT AHEAD OF YOU IN LINE AND I'LL HOOK YOU UP WITH THIS CRAZY LADY I SORTA KNOW WHO TRADES FOOD STAMPS ON THE BLACK MARKET!,' - yeah- just as I was about to scream that- something caught my eye.  No, it definitely wasn't Ms. Food Stamp 2012 *OR* her husband with the always classy Confederate flag tank top.  It was one of those fly-by-night Halloween Craft/Decor magazines.

Now, I say 'fly-by-night,' but I don't mean it in the traditional sense of the phrase- this was a Better Homes and Gardens publication.  I mean 'fly by night' as: it isn't a regularly published thing, and most of the projects seem to be gathered from past regular issues and/or hurriedly commissioned.  However, take no offense, Better Homes.  Kory loves you, he ain't talkin' no smack.

I PROMISE to return, find the issue (and probably buy it, too- it does have some cool stuff) and tell you the actual name of it and the name of the designer who inspired my Little Goblin.  In the magazine, there's a cute pair of little creatures- created from wire and clay, on top of those little papier-mâché (thanks, spellchecker!) boxes that you can always find for a dollar at the big craft stores.  The project looked so fun that I knew I had to run home and create my own version.  Well, I had to run to Jo-Ann, first- of course- papier-mâché boxes don't materialize out of thin air!

Just in case you're tempted to get right to work at creating a Little Goblin of your own, here's the supply list:

  • Little papier-mâché box.  
  • A very lightweight, air-drying modeling clay.  I used FIMOair and give it my highest recommendation.
  • Some kind of bendy wire.  I used some kraft paper-wrapped floral wire.  I forget what the article said to use- but I'm pretty sure she used some kind of floral wire, too- but it wasn't paper wrapped.
  • White floral tape (to wrap your wire- but if you use paper-wrapped, you could just as easily paint it or use some Distress Stain.  Believe me:  there will be much more about the magnificent multi-functional amazements that are Mr. Holtz's products later!  
  • Wire cutters.
  • A selection of 'colors.'  Paints (especially watercolor), gelatos, pastels - whatever you have and want to use for your colors, gather up a nice Halloweeny selection. 
  • A small piece of cardstock, for the flag.  (This should be easy- if you don't have any cardstock laying around, I have no idea why you're here or where you came from.)
  • A 'Happy Halloween' stamp, or if you have lovely handwriting- a nice pen.
  • Some scraps of fabric, to create a charming little ensemble for the little critter.  Unless you're creating a little nudist goblin.  Well, in that case- you'll still need a bit of some fabric.  From what I understand, they always carry a towel in case they need to sit down.
  • A small styrofoam ball- in whatever size you want for your goblin's head.  The ball I used was just a bit bigger than a golf ball.

A little note about the 'colors,' mentioned up there:

I used quite an assortment of Distress Inks, Distress Markers and Distress Stains-  and even some of Dyan Reaveley's jaw-droppingly amazing 'Dylusions' ink spray.  (Yes, I'm full of praise for the genius of Mr. Tim Holtz's products and for Ms. Reaveley's Dylusions, but trust me- the praise is deserved.  So, so effing deserved.)  Yeah, so - forget what I said about using anything else.  If you don't have any of Mr. Holtz's colors, go buy them all right now.  I'll wait.  Are you back?  Sorry, I forgot to tell you to buy all of Ms. Reaveley's ink sprays.  You'll hafta run right back out.  Go ahead and buy every color, up front.  Trust.

Okay, then?  Okay, then!

I had planned on painting the papier-mâché box a plain, flat black.  But after running around the city in 100+ degree weather for most of the day, I was tired.  All of my bottles of craft paint were on a shelf, ten feet away, safely nestled in a box.  Yes.  I was TOO LAZY to get up and get a little bottle of black paint which was BARELY TEN FEET AWAY.

However, it turns out that my laziness is a good and beneficial trait.  How so?  Instead of painting the little box with plain old black paint, I used things within reach!  I rubbed some Rusty Hinge Distress Ink all over the box and inked some edges with a combination of Frayed Burlap and Walnut Stain.  It didn't seem to be bright enough- I wanted a bit more orange.  And there it was- my brand new bottle of Dylusions, in 'Squeezed Orange.'  The bright and translucent Dylusions over the darker (and definitely more Halloweeny) Rusty Hinge and Frayed Burlap combined to give me the look that I didn't even know I wanted:


Except for cutting two little holes in the box's lid to stick the little goblin's feet through so's he can stand up proper, that's it for the base!  How easy is that?!  

Next, take the wire and form it into a goblin skeleton.  I love this kraft paper covered wire- as I played with it, I kept coming up with all kinds of ideas for projects to use it on- I picked it up in the floral supply section at Jo-Ann.   


See how the wires extend at the tip of the 'foot?'  Kinda like those monkeys with the long toenails?  No, I don't know what I'm talking about, either.  Anyways- stick those through the little holes you cut through the box's lid and bend them over to secure your little goblin's skeleton to the base.  Now, it's nothing but PURE fun from here on out!  It was at this point I was still trying to decide: color the kraft paper or leave it kraft-y?  I went ahead with the white floral tape.  Pulled the skeleton off of the base, wrapped his little limbs with the white tape and liked it- looked very skeletal!  Now: time for the head!

Push a styrofoam ball onto the neck.  Tear off a big enough lookin' piece of the FIMOair clay.  Warning: here's where my instructions get VERY technical.  Take the piece of clay and like you did with Play-Doh, smoosh and flatten it into a fairly thin 'pizza crust.'  Lay it over the styrofoam ball and squish it into place.  Pinch a nose on, make some eyes and TA-DA!  


Your goblin is almost alive.  He's still somewhat fetal, so be gentle, dammit.  Put him somewhere safe while his head dries out and get to work on the rest of him.

The minute I saw how the wire arms looked, I knew he needed to be carrying a little flag!  I used the "Tattered Banners" die from Tim Holtz to make the flag.  I ran the die through my BigKick with a piece of manila cardstock, stamped it, colored the letters in with Distress Markers and inked the edges.  I used one of the biggest banners, so cut it in half to fold the cut edge over another piece of that wrapped wire.


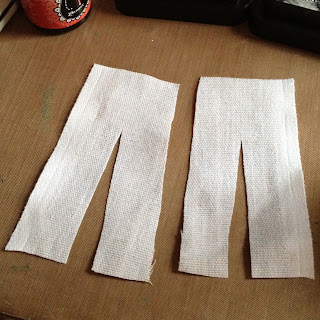
I dug up a few pieces of scrap bits of fabric.  Found a bit of burlap that I thought would make a nice scarf.  Found some dense canvas like stuff for his pants.  For his shirt, I found a sleeve I'd cut away from a flannel shirt - no,  I wasn't getting dressed up for a monster truck rally.  It was part of my zombie costume from a few years ago.  I knew I'd need the sleeve one day!  Sometimes, hoarding does pay off!

Now, don't get all scared and think you'll need sewing skills.  Cuz ya don't.  He's a goblin, who probably makes his own clothes.  They're supposed to look a little raggedy, a little crazy.  He's a goblin, not a contestant on the new season of Project Runway.


The pants were the trickiest part- and they were still very easy.  Just cut out two 'pants shapes, like I did up there-    No!  Put the needle down!  You don't need it!


Yeahp!  I used the Tiny Attacher!  I did one seam inside out and flipped it- kinda like real sewing- but I wanted some of the staples to show, so I did the other seam on the right side.

Goblins might be a little trashy, but they still don't wear white pants after Labor Day.  I misted them with a bit of water and rubbed some Black Soot and Vintage Photo Distress Stain all over them, added a belt, and- yeah, I didn't think this skeleton bit through all the way- so I had to disconnect him from the base yet again, to get him into his pants.


There they are, with a bit of twine for a belt, too.  The shirt was so easy and fast, I forgot to take a pictue of the moment I made it-  just a long rectangle with a 'neck hole,' which I cut a slit from one side (to dress him, without popping his head off).

Time to paint his face!

Again, I used Distress Inks.  How great are these products?!  Stamping, embossing, distressing, aging, painting- you can do ANYthing with Distress Inks.  I tapped the pad against the craft sheet and used my water-brush.  Love those things!  I didn't have any pre-planned ideas as to how to decorate my goblin's head.  I just went at it:
 

And from behind:


I really like how the shades of Distress Inks blended together.  Looks like old bone, doesn't it?  I wrapped his little burlap scarf around his neck, put the flag in his hand- and I was done.

Wow.  If you made it this far through this overly long, rambling, poorly written and unedited post-  give yourself a pat on the back and enjoy two more pictures of my goblin!

I've got another fun Halloween project coming soon!  Hope to see you back!


Wednesday, June 27, 2012

Lyric Theatre's BYE BYE BIRDIE and...A Birdhouse.

Last night, went to Lyric Theatre's first night of the first show of their summer season, BYE BYE BIRDIE.  It was a a ton of fun, in the only way 1960's musical comedy can be-  dammit, what a good time!  And so much fun to see a professional production of a show that's been beaten to death in high schools across America.  If you're in OKC, buy a ticket!


That's me, with my date for the evening, Jessica.  She's not only the prettiest lady in town, she's also my favorite actor in town!

Another Jessica I know-  the one I call 'Baby' Jessica, called me up to ask a favor.  Yeahp- so that's my segue- one Jessica to the next-

Baby Jessica called me up, to ask a favor...

Along with her father, she was doing something for a charity.  They were having some kind of benefit, a party and auction.  They were supposed to decorate a plain wooden birdhouse.  At the benefit, all of the birdhouses, that different people had decorated, would be auctioned off.  They had no clue what to do- so she called to ask if she could bring it over- for me to decorate.

Of course I said, "Hell YEAH!"

Here's what I came up with:


As I dived into this project without any plan of attack, it took much longer than it should've... but it ended up working out in my favor, as there was a nice layer of paint on it before I came up with the plan of attack!  

First, the entire birdhouse was painted with a coat of off-white fitty cent pain from Wal-Mart.  After lots of staring at the thing, I smeared and rubbed some dark brown and light brown paint in random streaks. (More fitty cent paint from Wal-Mart.)  At this point, it looked like a huge mess.  More like a birdCRACKhouse.  So I attacked it with some Vintage Photo Distress Stain.  That didn't help in the attractive department, either.  I thought, maybe it needs some color.   That's where the bright blue came to be in the spaced between the 'boards,' and where the door was painted red.  In honor of my Grandma's favorite perfume?  I don't know.

As I was staring at my shelves of product.  I grabbed the little bottle of Mr. Holtz's Antique Bronze Crackle Paint.  I randomly slapped thick patches of the crackle paint around the house.  Now, this isn't a tiny birdhouse that fits in the palm of your hand.  It's pretty damn big.  And I was sure I'd use the entire jar of crackle paint.  Nope.  Didn't even make a dent in it- looked like it was still more than 1/2 full. (Optimistic, aren't I?)  Seriously!  I'd been "takin' it easy" on the crackle paints, because I was afraid of running out too soon!  Let this be a lesson- there's more than it looks, and it goes farther than you think!

And that's where I called it a night.  I left the birdhouse to dry for the night.

When I returned to my project the following day, the crackle paint had - well, you know- it did what the name implies.  IT CRACKLED!  Beautifully.  I rubbed some Walnut Stain Distress Ink into the cracks, just as his highness, Mr. Holtz, has taught us to do.

Here's where the embossing comes in-  I just felt that I want to melt some embossing power on the thang.  I used the 'Aged Copper' from Stampendous.  I love that way this stuff looks.  I dumped it around the edges of each window and blasted it with the heat gun.


To finish up, I smeared some Walnut Stain Distress STICKLES around the edges of the roof, door, and anywhere else that looked neglected.  I superglued the gear and game spinners to the very front top of the roof.  I superglued the Idea-ology 'Ornate Plate' over the hole- wait, what's that called?  The 'Bird-Door?'  I don't know.  I also superglued a game piece above the door, as a house number.

It still didn't look 'finished,' to me.  My basket of tapes caught my eye.  I grabbed a few rolls of tissue tape and stuck two small pieces to the front of the house- there on the windowsill and a piece right above the window- which mostly became transparent when I smeared it with ink and glue.  After attaching more strips of tissue tape to the 'ground' around the house, like some kind of walkway or 'yard,' I was DONE!  I delivered the house to Baby Jessica's Dad the following morning!  I've yet to hear what it sold for, in the auction at the benefit.  Part of me doesn't want to know.  I'm happy with my daydream that it went for thousands of dollars and the board of directors are speaking of me in hushed, reverent tones and announcing me as the one who singlehandedly supported their cause...


Sunday, March 11, 2012

Making Ribbons

Hi there, everyone!

What a weekend.  Yeah?  One thing you know, it's Friday and the next thing you know, it's time to lay out your clothes for work and watch THE WALKING DEAD on TV...

Speaking of work, I'm not gonna be in the mood to get up and go tomorrow.  Why?  Because of the stupidity that is the time change.  I hate Daylight Savings Time time.  My internal clock is screwed up.   I'm gonna be crazy and mean at 8AM tomorrow.  I promise you.

But now- it's time to talk about making ribbon!

Why make ribbon?  And is this really ribbon?  I call it ribbon, so there- it's ribbon.  I've used this on lots of projects.  It adds a great touch, and you can adapt it to make any kind of ribbon 'look.'

First, cut a strip of plain, unbleached muslin.  This stuff is cheap.  And versatile.  And looks good.


One of my favorite things to do, when 'makin ribbon,' is to stamp the muslin. My favorite stamps to use when doing this are Distressing Stamps from Glitz.


Here is the stamped muslin.  Looks cool, doesn't it?  The muslin takes the ink very well.  It looks like the fabric 'came that way!'


Let's look at that close up!


I also like to color the strips with some Distress Stain, then cut it into smaller strips.  Here, I've used some Weathered Wood and Vintage Photo Distress Stains.  I usually mist the fabric with water before applying the stains- it seems to both help the fabric take the stain and gives it more of a worn/streaky look.  Which I like.


I really liked how the strip from the 'numbers' stamp turned out.


I decided to make a few strips without any stamping.  Misted with water, put on some stain.


Wrinkled it up into a ball and dried it with my heat gun.


And SURPRISE!


Cool lookin strip of fabric!

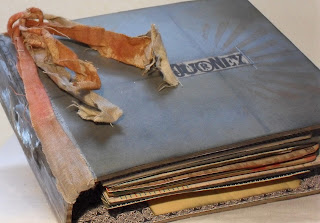
Which I cut into smaller strips and tied to a mini-book that I've been working on for months.  Yeah.  Months.  I keep doing a little bit at a time.


I like how they look on the side of this book, but not sure what else I'll do to them or tie to them or..


So, make some ribbon!

I'm going to relax for a little bit and then try to go to sleep as early as I can, so that I don't feel like too much nasty when I try to drag myself to work.  I think it'll be a Benadryl night.

Oh yeah!  Remember my little contest?  Well, besides from makin' ribbons, I also used one of your ideas and made something with my cool little stamp!  I'll show it to you tomorrow!

-kory

Sunday, February 26, 2012

The Rosette Bowl!

As much as I like to complain about Mondays, I hate to complain about Sundays- but I will:

I don't like Sundays, either.  Lots of stores are closed and you can feel Monday hovering over the entire day.

My Mom wanted me to come over and help move her new mattress up the stairs and into her bedroom.  Because we're so classy, we didn't have to carry the old mattress down the stairs to get it out of the house. How did we get the old mattress out?  We threw it off the balcony.

Once I got home, I sat down at my worktable and started playing around with stuff.  I didn't know what I wanted to make, I just knew that I wanted to make SOMEthing.

The first thing that caught my eye was my plastic bin of punches.  I dug through the jumbled mess and saw the double-loop border punch.  I wanted to know what it would look like if I folded it into a rosette.  I cut a strip of kraft cardstock, punched it, then scored, folded and glued it into a rosette.  I brushed the edges with some white American Crafts pigment ink.  Pretty cool looking:


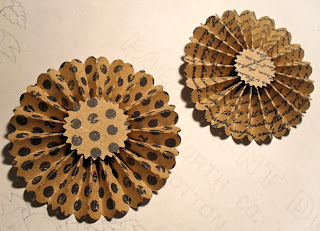
I couldn't think of what to do next.  I started sorting through lots of stamps and placing them into plastic binder pockets.  I came across some 'Distressing Stamps' from GLITZ that I had forgotten all about!  I grabbed another sheet of my favorite Kraft cardstock and my Tim Holtz Mini-Rosettes die.  I wanted to see what they'd look like if I stamped the paper before assembling the rosette.


I LOVE these stamps!  I found them on clearance at Hobby Lobby for 7.79.  They're big and have great designs.  I loved the way this strip looked- it reminded me of my current favorite papers- Kraft Funday from My Mind's Eye.  I also stamped a strip of the cardstock with the 'handwriting' stamp, then ran them through my BigKick with the rosette die.  Here's how they turned out:


Don't they look great?!  For some reason, I'd always used a solid colored piece of cardstock when making them- I love how these turned out.

But now I've got a little handful of rosettes with no plan to use them!  I got out some blank cards and more paper and came up with this little 'thank you' card:


The stamp is from American Crafts.  The background paper is from the Tim Holtz Core D'nations Distress Collection stack.  I also used two strips of unassembled rosettes as a kind of border strip.  And used that 'dots' stamp, again, from the pack of Glitz 'distressing stamps,' stamped with Antique Linen Distress Ink.


The string is one of my favorite things to use on my cards- I got a big spool of it from the Dollar Tree!  It's just a plain twine, but looks kinda dingy white, and is very soft.  I need to pick up a few more spools next time I'm there- because, well, it IS just a dollar- but I seem to be using quite a bit of it!

As soon as I finished clearing some space off my table, I noticed that new stamp from yesterday.  He was staring me down.  Begging for me to use him.  And how could I say no?


Again:  I FREAKIN' LOVE THIS STAMP!

The card base is from a pack of tag card bases from the 'dollar bin' at Michaels.  I found the small scrap of light blue Distress Core D'nations in my scraps box- it was just the right size to fit in the Tim Holtz gears Texture Fade embossing folder.  I sanded it a bit and rubbed some Tea Dye ink on it, as well as some Walnut Stain.  I added one of the stamped rosette centers, with the tiny attacher.  The tape is "Tinted Tape: Aged," from Vintage Street Market.  There's also a trinket pin, a chain, and the 'IMAGINE' tag, all from Mr. Holtz, of course.   This is one of my favorite cards, in a long time.


I LOVE THIS STAMP!  I can't wait to find even better ways to showcase it!  What a charmer!

Alright, ladies and gentlemen.  I've taken a Benadryl.  It's time to try to get enough 'Sanity Sleep' before I have to try to face the week.  What is 'Sanity Sleep?'  It's like beauty sleep.  But I need sanity more than beauty, at the moment.  No jokes, please.

-kory


Tuesday, February 21, 2012

New Page Wednesday!

First of all- don't let that blog title fool you into thinking I'm going to upload a new page layout every Wednesday.  I'm not that disciplined.  Also, it isn't even Wednesday.  It's Wednesday Eve.  So I've already misled you twice.

My good friend, Holly, gave this photo to me.  It's a picture taken of us at her wedding.  It was a beautiful wedding with an even better looking open bar.  And I can tell this photo was taken very early in the evening, as I look spectacularly sober.


I swear, this photo looked a hundred times better when I was looking at it on the little view-screen on the back of my camera.  Hmmm.  I bet that you're now wishing you had a nickel for every time you've heard someone complain about the quality of their photo on a blog.

But Kory, WHAT beautiful products you've used! What ARE they?!

Glad you asked!

-Textured Cardstock, Ivory, Hobby Lobby (Store Brand?)
-Ripple from the Brook Collection, Crate Paper
-Julianne Vintage, Die Cuts, K & Co (Plaque with date, under photo)
-'Script' Embossing Folder, The Paper Studio / Hobby Lobby
-Regal Crest, Tim Holtz/Sizzix Bigz Die (Leaves on sides of photo)
-EveryDay Fun Borders, Kraft Funday: My Mind's Eye (border)
-Thickers, Amy Tangerine, 'Goodness'
-Distress Ink, Victorian Velvet and Broken China (on the 'leaves')

There it is!

I think it turned out very great, very simple looking, and a memory of a very great and beautiful day.  However, Holly was a little cranky that I had to call her to ask, "WHAT DAY DID YOU GET MARRIED ON?!"

And I still swear it was in July- it was too freakin' hot that day, to be wearing a suit outdoors...


-kory

Sunday, February 19, 2012

The Weekend Ends...

Wow, what a weekend!

I am exhausted.  And tired.  And worn OUT.

...and I do not want to go to work tomorrow morning.

We closed the new play, FRESH MEET, last night.  After the show, I went out for what was supposed to be one drink, with my best friend, Jason.  We were roommates back 'when we were kids.'  We've known each other a long, long time.  He moves around lots, now, with his job as a very successful TV news producer.  So any time he's in town is an occasion to have a great time!  And as I was saying, 'one drink' after the show turned into a barhopping wild time.  Just like the old days.  I ended up staying up to four in the morning.  No, not out drinking until four- but when we did get back to my place, I got distracted by what I guess was an all night marathon of one of my favorite TV shows-  LOCK UP.  I love it when they show the women's prisons- the two ladies who run the loan shark business FROM THEIR CELLS crack me up...

Anyways, I did finally climb out from under my hangover long enough to make a card.  Yes!  It was time to try out my Mister Huey's Color Mist!  BUT FIRST, I needed some background music!  I went over to my record player and put on one of the new records I found at the thrift store on Friday.  This is the super cool record player that I found in someone's trash, last year.  Can you believe someone would throw this away?  It looks so cool and it WORKS!  The record is a collection of music from the '20s.  So fun.


With the music putting me into a great mood, I stared lovingly at my collection of Mister Huey's Color Mists.  And this was when I got the 'joke' of the name- MISTER Huey's!  Get it?  MISTER?  Clever! 


I've since peeled off the bright pink price stickers.  Hmmm.  Which to use, first?  Yeahp.  Calico White.  The first one I ever saw.  The shade that began a great love affair.

When I use any kind of mist or spray,  I use a big plastic bag.  I put whatever I'm gonna spray in the bottom of the bag and spray away.  


I sometimes see those cardboard 'Color Catchers' at the store, and often think about buying one- but I luckily come to my senses and realize that this works perfectly.  And it's free!

The mist worked perfectly.  A perfectly non-uniform, random mist.  I LOVE these!  I haven't been this excited about a purchase in a long time.  Now, to find the 'Clay' color!  

So- here's my card!


I used:
A Fiskars Triangle punch.  (Found at Big Lots for 3.00)
The 'chain' is a border\edger punch from EK Success
Spellbinders, Labels 1
Distress Inks: Frayed Burlap, Walnut Stain and Festive Berries
"Friend" stamp from Magnetic Poetry Word Stamps
The Kraft card stock is Michael's store brand
Colorful paper is from Kaisercraft's 'Surf's Up' collection

and of course, Mister Huey's Calico White!

Happy Sunday evening, everyone.  Have a great week!  Gotta run- THE WALKING DEAD is on!

-kory