Friday, October 26, 2012

BOO! A Halloween Banner

I can't get enough Halloween.  It's always been my favorite holiday.  I love going into every costume shop that I drive past.  Even though they are all almost identical and stocked with most of the same exact product- I'm still thrilled.  The only thing I don't like about Halloween stores are the dip$h!ts blocking an aisle while they giggle over the "Dr. Seymour Snatch, Gynecologist" costume, as if they've never seen it before or as if it were even hilarious.

I also like to decorate for Halloween.  I usually go through obsessions with a specific 'item.'  For many years, I had to make a scarecrow for the front porch.  One year, it was ghosts.  One year, it was 'googly eyes.'  You know those plastic googly eyes?  I thought I HAD TO GLUE THEM TO EVERYTHING.  Initially, I only bought them so I could glue them to a kleenex.  After I'd wrapped the kleenex around the top of the Tootsie Pop, of course.  But then, I couldn't stop.  I glued those eyes to everything. 

What am I obsessed with this year?   The same thing everyone else in the craftosphere has been obsessed with for a year- BANNERS AND GARLANDS!!!

I would love to think of myself as being so unique and cool as to avoid a trend.  But I'm not.  I like a trend as much as the next hexagon-hugger.  And banners are so freakin' cool.

So here it is, Kory's Halloween Banner:


As you can see, it only says BOO.  My first 'want' was to do an entire HAPPY HALLOWEEN banner- but then I thought of all the letters.  So BOO it was.  Not that I'm lazy, I just didn't know where I'd hang such a monstrosity.  (get it?)

I wasn't content to just hang the pennants on a string.  I've been dying to use my new Tim Holtz stamps, from Stampers Anonymous: CLASSICS #6.  They look like borders- filled with distressed text and all kinds of beautifulness.  I stamped the 'crown' strip looking one a few times onto some manila cardstock and cut them apart.  Then, with about five different colors of Distress Inks, I colored them into some nice fall shades and flicked some water on them for some splotchy creepy beauty.

Here's some close ups of each flag:


I used a slightly smaller sized pennant for the 'end-caps.'  After cutting each pennant, thank you Spellbinders, I embossed the edge.  You know, as you do and as is the beauty of Spellbinders.  However, I don't emboss with my Spellbinders the way everyone else (and the way Spellbinders say to do it).  It just seems like so much trouble to run the things through a second time with the rubber mat to get the embossed edge- especially for such a simple shape.  After I run the die through to cut the paper, I just lay it on the table and run my stylus along the edge of the die- and zip, zip, zip- each one is embossed.  Takes seconds! 

Then, I stamped the pennant with a wood background stamp and inked the edges.

For the cat's base, I used a plain 'scalloped circle.'  I painted it with some plain white acrylic paint, distressed and inked the edges and stamped with a Tim Holtz text stamp from one of the new Halloween sets. 

I cut the cat with some black KraftCore the small Movers and Shapers die and roughed it up with some sandpaper Then, I spent about an hour obsessing over and admiring the beautiful wonder that is KraftCore.  How amazing is this stuff?!


I cut the letters out of more KraftCore, using my Cricut and the Happy Hauntings cartridge.  I sanded them, inked randomly and smeared some Rock Candy stickles on each letter. 

I took some plain twine (from Dollar Tree- I love their 'kitchen twine!) and colored it with some Brushed Pewter Metallic and Bard Door Distress Stains.  I threaded the twine through the tops of each pennant and then put the entire thing together with the border strips with some brads.  Now that I'm looking at it again, I wish I'd pulled out my Texture Hammer and banged those brads a bit!  Oh well, there's always tonight.  No, there's not TONIGHT.  Tonight, I've gotta run home, finish sewing my Halloween costume (I'm gonna be a werewolf) and go to a Halloween party.  Yeah- I made my own costume with some fake fur (what a mess) and my sewing machine.  It was like Project Runway up in that house last night!


Supplies:

Cardstock:
     Plain Manila
     KraftCore: Black
    
Sizzix: Tim Holtz
Cat/Raven Movers and Shapers

Spellbinders: Nestabilities
     Scalloped Circles
     Lacey Pennants
     Lacey Circles

Stamps:
     Stampers Anonymous: Tim Holtz, Classics #6
     Mini Halloween 3

Cricut Expression 2 and HAPPY HAUNTINGS cartridge

Distress Inks:
     Vintage Photo
     Aged Mahogany
     Rusty Hinge
     Black Soot
     Dusty Concord
     Frayed Burlap
     Scattered Straw

Distress Stains:
     Brushed Pewter Metallic
    Barn Door

Twine: from Dollar Tree
Brads
White Acrylic Paint
Sandpaper

Sunday, October 21, 2012

TAGGING ALONG! Mr. Holtz's HALLOWEEN tag!


Heyyy there, everyone!

What a crazy busy week!  Along with everything else that pops up during a regular Monday through Friday, I was also somewhat busy with the production of FRANKENSTEIN at the theatre I work for-  what a production!  And a great set.  If you're in the OKC area, get yo'self downtown and see FRANKENSTEIN!

We've reached the second half of October.  Halloween is speeding towards me and I still don't know what my costume is gonna be...  decisions, decisions.  But at least I DID finally sit down and make my version of Tim Holtz's OCTOBER tag!

I LOVED the technique he taught us with this tag-  smashing and smooshing up the tissue paper when gluing it down and smearing acrylic paints on top.  It was fun and just looks great!  I didn't have a roll of tissue wrap - so I used a 'newsprint' background stamp on the tissue paper, first.  It looked pretty similar.

The skull was stamped and embossed before I ever-so skillfully cut it out, using my nifty Cutterbees.  Those scissors are little gifts from God, aren't they?!  I also embossed the 'Happy Halloween,' using some gold embossing powder.  The 'Happy Halloween' stamp is one of my favorites- I found it in the dollar bin at Jo-Ann last year.


There's some detail of the newsprint and colors.  I LOVE this technique!  It's somewhat similar to what I did on another Halloween project- but it was a 'technique' that I kinda made up as I went- I'm excited to add paint to more projects, now-  I LOVE PAINT!

Here's the full view of my version of Mr. Holtz's October tag:


Hope all y'all are having a great weekend!  Be back soon!

-kory

Thursday, October 4, 2012

What's UP in KORYLAND?!

It's been a busy week! 

A busy CRAFTY week, too!  Which is always good.  Isn't it?

I think it's a combination of the darker weather, the cooler weather and the approaching HOLIDAY season that's hitting my bloodstream in the way a ten dollar crack rock ignites the GO GET 'EM attitude in a streetwalker.  You know what I mean.  YOU know.

I spent a crazed lunch hour at OKC's hidden treasure- BASKET MARKET.  Awww.  You don't live in OKC and can't experience the pile of cheap scrappy goodness that can be found at this unofficial Hobby Lobby outlet?  Well!  You should move to OKC so's you can experience the fun of fighting over a brand new sheet of Studio Calico with your right hand while your left hand tries to grab and drop a package of SPELLBINDERS down to your foot so you can deftly kick it across the aisle into your (already full) basket.

Wanna see today's haul?  Ya do?!  You nasty perverts.  Always up for some ScrapPorn, aren't ya?!Here it is:


I don't know if you're going to believe me or not- but ALL of that scraptacular goodness was purchased for 39.16.  That's right.  Not even forty bucks.  As we say on the corner of 1st and Main, "What you driving away so fast for, Mister?!  That's a BARGAIN!"

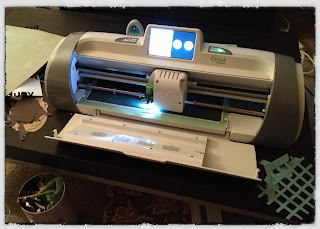
Besides shopping- what else have I been up to?  Well, believe it or NOT, I got the Cricut out!  My poor, neglected Cricut Expression 2.  Purchased in a fit last Black Friday, amongst cries of, "I MUST HAVE IT NOWWWW, I SWEAR I WILL USE IT ALL THE TIME," then left to sit on my shelf.  Sitting on my shelf, staring at me like a kid with a runny nose. 


There it is- all lit up and cutting like a pro.  See that lattice-y looking thing to the right?  I love that- can't wait to find a reason to use it...  Also had great fun cutting out lots of stuff from the 'Happy Hauntings' cartridge.  Has anyone cut out the entire 3-D Haunted Mansion, from that cartridge, and lived to tell the tale?  Call me.  I'd love to hear about it. 

I've also been throwing together some layouts like it's no tomorrow.  Because, as far as we know, there won't be a tomorrow.  Mayans, you know.


That's the 'background' of one of my STATE FAIR layouts, using the very inspirational "MIDWAY" collection from those geniuses over at OCTOBER AFTERNOON.  Can they get any cooler?  I love how they manage to be cool, vintage, modern AND colorful all at the same time? 

As you can see, I cut a few pieces of papers from the MIDWAY collection into strips and kinda threw them down and attached them (thank you, Glossy Accents!) to the base paper.  The 'detail,' on this layout of mine, that I'm obsessing over is this:


No, I didn't get my sewing machine off it's lonely shelf when I was breaking Lil' Cricut out of jail- those ain't real stitches!  I know, it fooled you.  They're just RUB-ONS!  Yeah, I'm sure all y'all have seen rub-on stitches before- but for those of you who haven't and especially for those of you that didn't know such a wonder existed:  YES.  You don't have to sell your blondest child so you can get a sewing machine so's you can make them classy layouts with nifty zig-zagging stitching.  You don't even hafta fall for an infomercial's claims that their little piece of plastic and crap can sew a hem on a skirt while you're wearing it so therefore it should stitch a photo to a piece of cardstock.  No.  All you gotta do is go to Jo-Ann and pick up packs of RUB-ON STITCHES from their DOLLAR SECTION.  Yeahp.  Gets even better, don't it?  Not only can you quickly and painlessly add stitching to a layout, but it will only cost you ONE DOLLAR.  Amazing days we live in, huh?

Alright, people.  I got paperwork to do, calls to make and coffee to drink... so's I can get back home and rub stitches on cardstock. 

See you soon.

-k

Tuesday, October 2, 2012

Mama? How many more sleeps 'til Halloween?


I am too excited for Halloween.  I can't drive by a Halloween store without slamming on the brakes and running inside, to try on hats and play with motorized 'Zombie Babies.' 

Until I can decide what my costume will be this year, I'm keeping myself busy with random Halloween projects. 

The first project this week?  This cute Halloween tag! 

I used a Martha Stewart Halloween stamp set to get the witch hat.  I cut it out and stuck it on the top of the guy- he's one of my favorite stamps from Catslife Press.   I stuck a fall-colored 'jewel' over the number on the guy's suit, since the number '14' didn't seem too Halloweeny.  The skeleton in the background is from one of the new Crafter's Workshop templates!  There's also a strip of Martha's Halloween paper tape and lots of Distress Ink colors.